Rack-Mounting Procedure
Use the following procedure to rack-mount the GigaVUE-HC3 chassis:
|
1.
|
Determine whether you need to center-mount the HC3 chassis in the rack. Front-mounted nodes sit flush with the front of the rack while center-mounted nodes will extend in front of it. However, it is not recommended to flush-mount the GigaVUE-HC3. GigaVUE-HC3 will partially extend in front of the rack when properly mounted in a four post rack. For two post racks, center mount the chassis. |
|
2.
|
Make sure you have not installed any modules in the chassis yet. Gigamon recommends rack-mounting the GigaVUE-HC3 chassis before installing these items to make it easier to handle during the installation. |
|
3.
|
Select a suitable location for the rack that will hold the GigaVUE-HC3 chassis. Choose a location that is clean, dust free, and well-ventilated. You will need access to grounded power sources. Avoid areas where heat, electrical wire, and electromagnetic fields are generated. |
Plan for enough clearance in front of a rack so you can access the modules easily (approximately 25in) and enough clearance in the back of the rack to allow sufficient airflow and installation of the rear components such as power supply modules. Also, if you plan to install the optional cable management assembly, allow another 3.5in of clearance at the front of the node.
|
4.
|
Follow the instruction included with the slide to properly assembly the slide. The assembly for mounting in a four post rack differs from the assembly for center mounting in a two post rack. |
|
5.
|
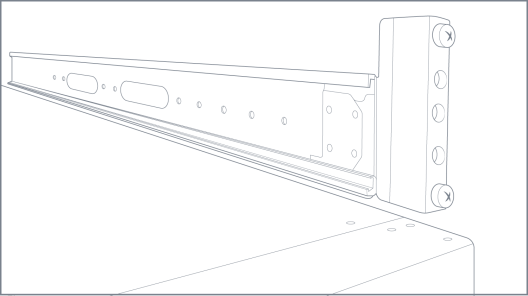
Locate an open 3RU rack space and install the left and right rails of the mounting slide in the rack. The assembly for a four-post rack differs from the assembly for a two-post rack. Refer to Figure 1 Slide Rail Installed in Four Post Rack. |
|
Figure 2
|
Slide Rail Installed in Four Post Rack |
|
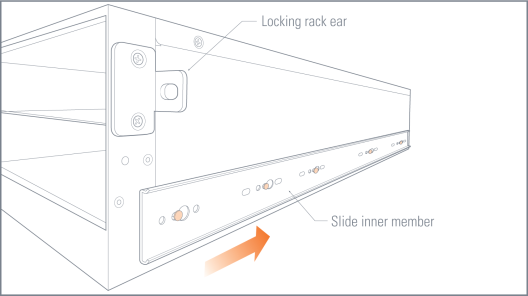
Figure 3
|
Slide Inner Member and Locking Rack Ear Installed on Chassis |
|
7.
|
Locate the 3RU rack space where you installed the left and right slide rails and lift the node into place. It takes two people or a scissor lift to place the GigaVUE-HC3 in the rack. |
|
8.
|
Carefully lift the chassis and slide the inner members of the slide attached to the chassis into the slide rails attached to the rack posts |
|
9.
|
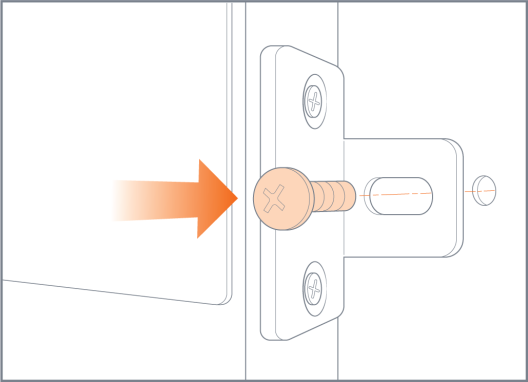
Insert the screw through the locking rack ear on the chassis to secure the node in place and keep it from sliding out of the slide rail. Tighten the screw. Refer to Figure 3 Locking Rack Ear Attached to Rack. |
|
Figure 4
|
Locking Rack Ear Attached to Rack |


